Navigating Keyline Design for Water Management and Soil Enhancement
Keylines are just fancy underground swales, or something
Sorry for the subtitle— I’m sure some of you felt your blood pressure jump. While people usually hear about swales most often, keylines are similar but also completely different tools for different situations where swales don’t make sense.
So, what are keylines? Well, let’s start with what their purpose is, and I’ll refer to the godfather of the subject, P.A. Yeomans, who says:
“A principal aim of Keyline is to increase both the depth and the fertility of the soil so that the soil of farming and grazing land is safe and permanent and capable of continuous improvement. Thus productiveness of the soil is increased and the quality of its products is improved. Keyline seeks to remould the landscape, first, by the proper assessment and appraisal of all the natural and renewing resources of each individual area on which it is applied and second, by special methods of planning, design based on water control, and land management, to use those resources to the utmost for bettering the soil. Soil, the raw material of all agricultural pursuits, owes its existence and its state of fertility and productiveness to many factors. The principal circumstances which have determined a particular natural soil are (1) the minerological and structural framework, (2) the prevailing climate, and (3) the soil’s biotic associations. Likewise those three factors in combination determined the type of the natural landscape which contained or housed the original soil. All present farming and grazing practices have involved a drastic interference with the previous landscape. It is the manner of that interference which is of the utmost concern in Keyline.”1
Fortunately, we have covered a lot of the framework in previous chapters, primarily the forest succession and the soil episodes.
The basic purpose of keyline design stems around the basic understanding that by giving oxygen and water the ability to penetrate into the soil, we can increase the depth of topsoil quickly, increasing the organisms that live within the soil and allowing roots to penetrate more deeply into the soil, allowing biomass to accumulate deeper into the soil and ultimately allowing the soil to hold more water because of that biomass. Further, as we will discuss, by working with the topography, we can guide water in similar ways to swales, but done primarily underground.
Keyline plans the evolution of the replacement landscape on the two most permanent features of the natural landscape, (1) the existing shape and form of the land, and (2) the climate, which in large measure has moulded and determined its present topography. As the course of water is determined by the land form over which it flows, all the waterlines of land are individual to each property because of the endless variations in their topography. Therefore, to fully understand and assess and plan water control and water movements, the various component shapes of land have been classified in the Geography of Keyline. So, what is a keyline? This is what causes a lot of people to stumble, or just simply ignore keylines and focus on using swales, because keyline is a bit more complex than basic swale systems, and I highlighted some of this in why a lot of swale designs aren’t ideal, because the legwork is rarely put in to assure that the swale designs are appropriate for a site.
Keypoints
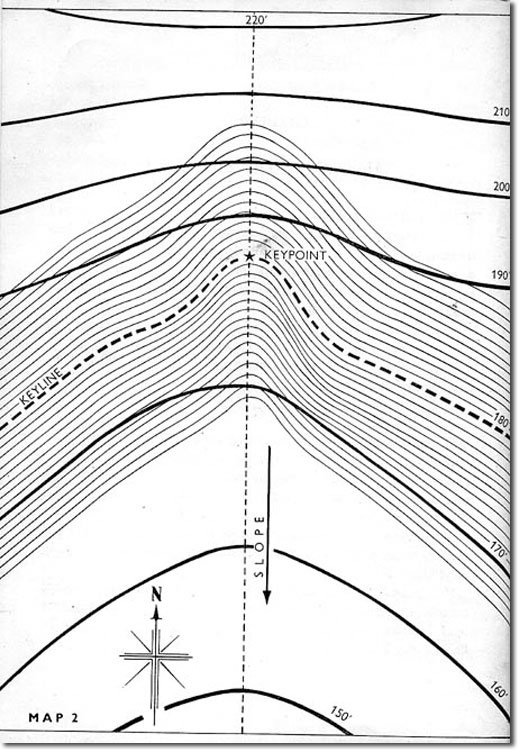
Yeomans states that “A Keyline is a level or sloping line extended in both directions from a certain point in a valley, called the Keypoint. It marks or divides the two types of relationship, always in the same vertical interval, that a valley bears to its adjacent ridges. In one of the relationships, that above the Keyline, the valley will be narrower and steeper generally than the adjacent ridges on either side of it. In the second relationship, existing below the Keyline, the valley will be wider and flatter than its immediately adjacent ridges or shoulders. The approximate point of that relationship change in the valley is the Keypoint of the valley. A line, either a true contour in both directions from that point, or a gently sloping line rising in one direction and falling in the other direction — from the Keypoint is the Keyline of that valley area. All points on the lines marked with the various heights are the same height as indicated by the figures.”
On a specific contour line— let’s say, 100 feet, all points are 100 feet above “datum”. Datum very oftens mean sea-level, but may be any other permanent point. A contour line lies at right angles to the slope of the land; as the slope changes direction the contour lines curve and turn. Contour lines on a contour map are placed at regular vertical heights apart. The distance apart is called the vertical interval. On farm contour maps these range according to the type of land formation and accuracy desired. On flatter planes, these contour lines may exist every 6 inches, while on steep hills these may exceed ten feet. The space or interval between two contour lines is referred to as a contour strip. A contour map exhibits the formation of land by means of contour lines. This should all, at this point, sound pretty similar to how swales are planned, right? At this point, we haven’t identified any significant differences, but we are focusing on a deeper level of detail because keylines require a deeper level of detail.
However, back in the 1930s, while the dust bowl was destroying the midwest, the United States Department of agriculture realized the value of contour design farming, and recommended that farms convert their production to contour farming— that is, farming crops based on a continuous flat plane, to reduce runoff and soil destruction. The problem farmers faced was that their equipment was not designed for this type of farming, and it became quickly a case of the government not understanding what the people doing the work actually do. And this system wasn’t perfect either, and we’re not going to even bother covering it. Yeoman was one of the folks who saw this response by the farmers and decided to take the principals of this research and develop a way it could become useful.
Very heavy rainfall, after it has completely saturated the soil which has been cultivated in that way, naturally starts to move to its normal concentration lines in the valley, But it is interrupted by the tendency of almost every cultivation furrow to impede it and drift it away from the valley. The flow movement of excess water is widened and its flow is kept very shallow. The necessary time of concentration is increased enormously, thus holding the water on the land longer. The land will have time to absorb the rain that falls on it.
Cultivation above the Keyline is first completed to enable land, usually the steeper areas, to absorb the maximum or all the rain that fails on it. That prevents rapid and concentrated run off onto the flatter slope country and so protects all the land from water damage. The general result is even absorption of rainfall over the whole surface of steep land, similar in effect to the absorption of rainfall on flat, fertile, absorbent land.
Now, that’s the 1,000 foot view of keyline design. And I know that probably confused most people listening, and it is something that makes more sense when you see it in person. Because of the technical nature of this subject, I’m going to be using a lot of examples to cover how to visualize how keyline design is developed and implemented, so this episode might be a bit different than most of the other ecologically focused content we have covered here.
Factors in Design
Before we get into that, like everything, there are certain factors to keep in mind before you even begin to assess where the keypoints are on your property, and those are the slope, soil type, soil permeability, the intended use of the site, the equipment you’ll use on the site, and the dept, type, and structure of the bedrock— that mineral foundation below the soil. The slope, for obvious reasons, can impact how you will design your system. The soil type will indicate how much runoff and how resilient the soil will be to intense water flows. Soil permeability plays into the soil type, because the health of the soil will increase permeability and reduce nutrient runoff and damage downhill. In contrast with swales, keylines are meant to be used for both tree and annual crops, extending your options for what you can grow. And lastly, the equipment you’re using on the site will impact what measurements you need your site to be able to be contained within. When we speak about bedrock, it’s important to remember if your bedrock is near the soil or subsoil, it cannot absorb water, and depending on the angle and mineral type in that bedrock, excessive water absorption can lead to things like mudslides, so if you’re in an area where that could be a concern— please check with a local professional.
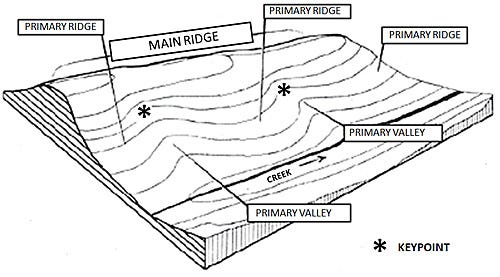
There’s some basic understanding of hills and valleys that are used to describe the landscape and to identify keypoints. So, let’s start from the very basic, beginning point. And I’m going to go kind of slow, because it can easily get confusing, but I’m confident that the example I’m going to give will help simply the whole process. Imagine you’re looking at a big hill. The very top of the hill, the main ridge, is the first thing you notice. You also notice, as it rolls down towards you, it’s not like a pile of sand dumped on a counter with smooth edges, but instead has bumps and dips across it as it drops down to you. The areas where it seems to raise higher, relatively speaking, down the slope, are called ridges, and the areas where it sinks lower, are called valleys. Makes sense, right?
What you may notice, especially if you’re looking at land that was not graded off for suburbia, is that those valleys that sink down more quickly have two things that make them stand out. The first is that usually the grass growing there looks healthier— this is because water follows the path of least resistance, and the lower spots get more water to run through them, as well as the nutrient runoff. The second is that, over time, and in many cases, a millennia, that water following the path of least resistance has created a steep dropoff into that valley the same way a canyon can be carved into solid rock over millions of years. This is the same process. And the bottom of that steep runoff, before where the land begins to slope back to a similar topographical dropoff the same way the rest of the land continues to run down the slope of the hill? That’s your keypoint. Because the water runs quickly to that stop and then slows down, a backlog of water takes place, and we use that to create keylines.
If you’re like me, and live in an older house that has countertops which slope a bit down, when you have a cold glass of water and the condensation runs off and to the edge of the counter, usually, before it actually runs down the countertop and onto the floor, it pools and begins to spread. That’s what’s happening, and we’re going to control that spread with keylines. We can trace keypoints to create keylines using this same concept, and our keylines run perpendicular to this ridge.
Once we know where our keypoint is, we want to go up and down the mountain following the trail of water. Where above the keypoint does the landscape change to show that water is beginning to funnel towards the keypoint? That is, where does the landscape change to be different than the rest of the hill? That’s the beginning of our valley. Conversely, where does the impression from the waterfall no longer make the land appear different from those ridges? That’s the bottom of your valley. Much like the water that pools at the edge of our countertop and spreads across the very edge of it, that’s what we want to extend as far as possible by identifying where the water is starting to collect and where it pools at the bottom. Analyzing the graphic above should help a bit in understanding exactly what we’re talking about.
From there, we can identify the keyline, which is the contour height of where our keypoint is. Again, think of the counter metaphor— the keypoint is the edge of the counter where the water is collecting, and the level edge of the counter— that is, the topographical height of the keypoint, is your keyline. In nature, of course, this contour line is probably not a straight line like our counter, but curves along at the same topographical height. As we identify this contour point, we can apply some of the basic techniques of swale systems to our methodology, which is why I wanted to cover swales first. Once we have our keyline, we can start to repeat this contour shape going up and down the hill at equal increments— work our way down until the slope ends and up to the top of the lowest ridge— if you recall, the ridges are the bumps in the hill.
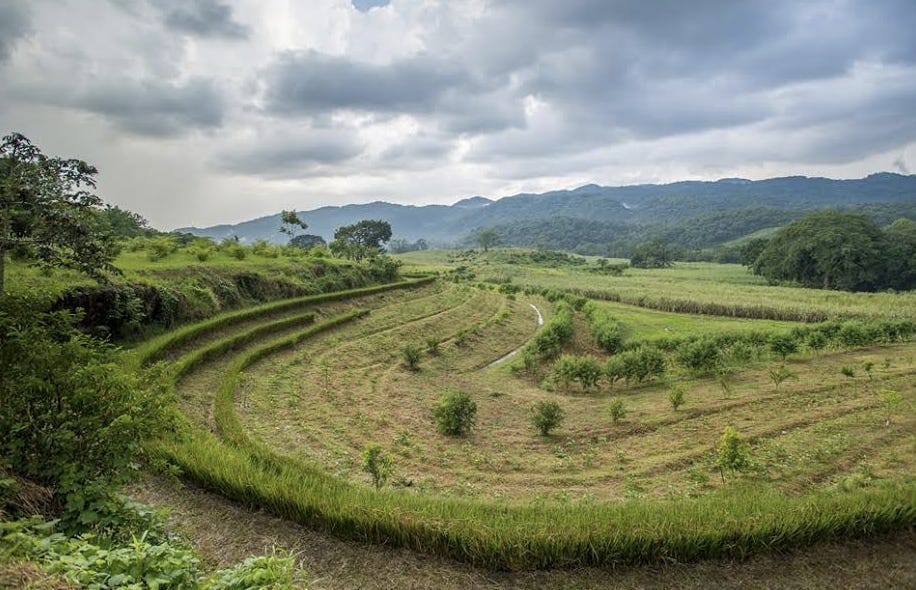
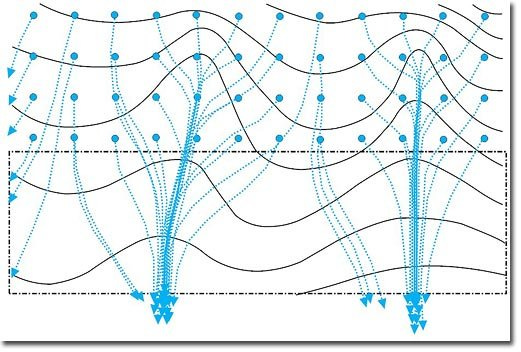
What I mean by work our way down is that we mirror the pattern created specifically by the contour of that keyline. We are not trying to keep the original shape of the landscape, we are trying to make the valley below the keyline have the same shape so that the water spreads evenly across the soil.. Think of the terrace farms you’ve probably seen in books that were common in Japanese farms. We’re doing something like that, except our point of reference is always on that keyline, and our goal isn’t to make terraces of the ground, but to break up the soil with keylines that direct water flow in this type of terrace shape. The keyline is where all the water is funneled to, and by manipulating the way gravity forces the water to travel, we are forcing the water to travel across more soil, by decentralizing that valley and the water it receives. Water always flows perpendicular to the contour line, so as the contour lines ebb across the property, the water expansion creates something like an s-shape pattern of movement through the landscape. By using this geometrical understanding instead of simply tracing the already existing contours, like in those japanese farms we had discussed, we are able to plant trees on what was traditionally dry land ridges without irrigation because the water is efficiently traveling across the same exact contour lines at different topographies— no site is getting more or less water than the others. The added benefit to this is that we are able to make those contour planes the same size. If you’re equipment needs the plane to be 12 feet wide, you can do 12 foot wide elevations, as long as the shape matches the keyline. Above the keyline, we want to mimic the shape below the keyline that we have been so focused on as far up topographically as we feel is necessary for our project.
Now. you might be wondering where a keyline ends? Well, it ends where a ridge begins, and that’s usually where the contour line changes direction, like the middle point in an S where the line begins in the other direction (scroll back up to the previous image for context). Now we will match the parallel contours on the ridges, which if we recall bump out instead of receding into the valley, giving the landscape that topographical map look that we associate with terrace farms. Generally, these ridges have fewer water management problems, and are not as a focal interest in developing this system.
So one thing you might be thinking as you read this and imagine tearing apart your prospective property to build these, well, kind of jagged topographic structures into the property is that, well, this seems like it might be hard to work on if I’ve got a tractor, or chicken tractors, or any other equipment that isn’t going to be malleable to sudden changes in angle to, again, match that keyline. The way to adjust for this is to use geometry to adjust those harsh angles by dividing the angle equidistantly. What I mean is, for example, if your keyline follows a sudden 40 degree angle, consider make it two 20 degree angles that soften the curve. Because land isn’t ever that simple, don’t expect it to be something where you can just split the difference, and there will be a lot of trial and error to make the land work for your equipment if that’s a concern of yours, but this is generally how you want to be thinking about this challenge.
Now, I want to reiterate, the keyline design isn’t to make terraced areas of a farm that drop off to the next level the way you might be imagining, but to identify the way water is flowing under the soil. The keylines are the natural path of the water flow that we’re exploiting, so when we cut in a keyline, we’re guiding how water is flowing below ground by providing the water the path of least resistance, starting with where it’s collecting— which is at the valleys, and specifically the keypoint. Therefore, while we cut in the keylines— which we will discuss exactly what that process is in a few minutes— this also reflects the planting pattern of our crops, whether those are trees or annuals.
While technically the water should saturate throughout the regions where the keylines exist, and we’ll discuss what that spacing should be towards the end of this chapter, this is why most trees are planted right next to the first keyline cut, so they have quick access to that water, so you can often see the contours on farms that apply this system. We are not looking to actually dig and move soil to make a contour the way we do with swales, but rather identify the water’s natural path across the property and direct the largest flow so that it is spread as far as possible, and doing this requires an understanding of the landscape that we can manipulate. Hopefully all of this is starting to kind of come together for you.
When we go from the theory of keyline to the application, one of the first things you’ll realize is applying is much more complicated than the theory. And the theory doesn’t seem super simple, either. What I mean is, that for 90 percent of us, keypoints aren’t as explicit on our property, and in many cases we nave numerous keypoints, and trying to marry these different points and the random ways our topography jams into itself can be a tiring effort to even understand where to start. There will be anomalies, and often times things don’t go by the book. Experienced people struggle with this in practice, even the ones who teach classes on it.
That said, keyline systems are overwhelmingly positive for sites and help build resilience in the face of increasingly extreme weather patterns, even if they aren’t perfect. What often happens is you will have to build out different keyline patterns, which means you might try to do one valley at a time, seeing how each plays out and impacts the rest of the site. Or, you might just focus on running water in various directions, some that eventually fizzle out over the landscape and others that lead into ponds. The reality is that we all have to be pragmatic as we try to iron out the weird anomalies that inevitably end up on our site. Part of this pragmatism is things like rounding off hard angles to match the curve our equipment naturally operates on, dealing with spots that may randomly run uphill for a couple of yards, and working around exposed bedrock.
Keyline ponds
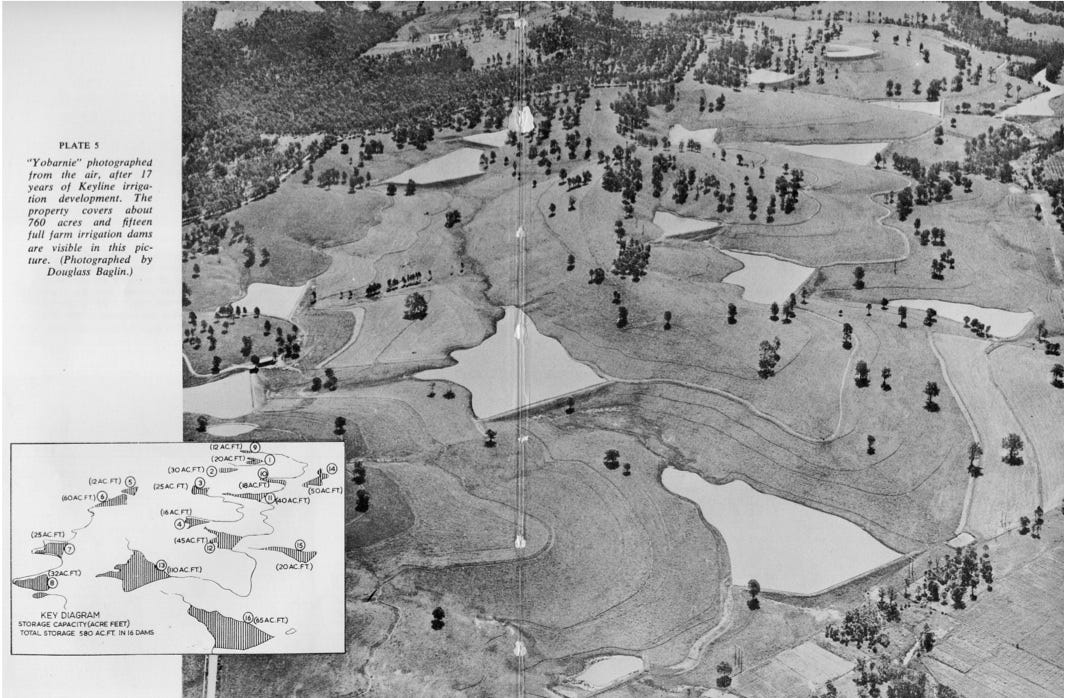
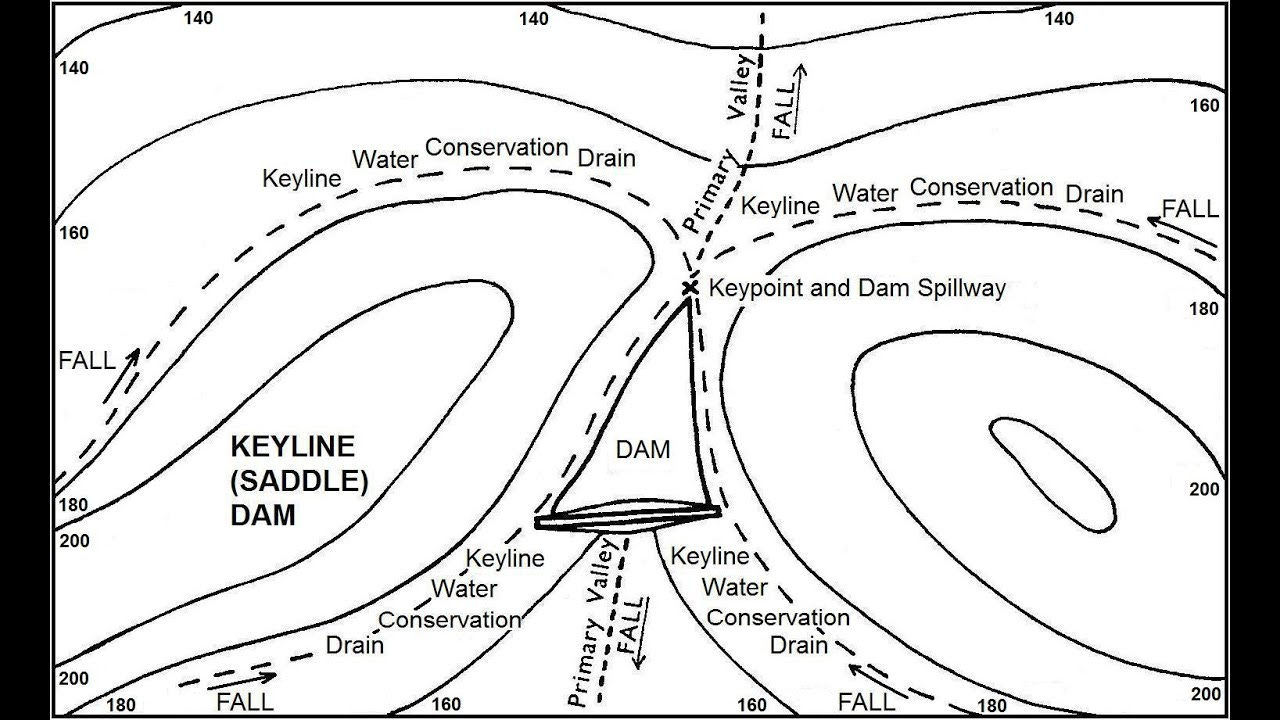
One of the things we haven’t really touched upon yet is that, in slowing down the water on the property and keeping it on the property, ponds are likely to form. The goal is to try and control where these ponds show up, usually at the bottom of your valleys, and then trying to guide their overflow into other ponds further downhill if you have a large enough property. Those overflows are often what we might want to call a swale. We can put ponds on either ridges or at the base of both valleys and ridges (take a look at Yeomans’ own farm above for a excellent example of this occurring).
Now, Yeomans was also interested in figuring out how to collect water in ponds at the highest elevation possible in order to store and use gravity to feed lower regions with water as it was needed. After the keypoint has been identified, the continued topographical drops below this are interesting, because the land tries to balance back out with the slope patterns of the ridge, the same way if you try to stack rocks up really steep on one side and sloped on the other, the steep side eventually tries to match the gradual slope. So, if you’ve had a bunch of steep drops, where that water has been running down and it hits the keypoint, where that steep slope stops, the next few topographical drops tend to be very small drops over a large space. These are frequently used as ponds. It is the highest, most economical water storage site in the valley, as any further higher is an expensive place not only to build a pond, but to also fill a pond, while this spot is naturally conducive to water collection, and is likely the flattest part of your property, at least along the sloped hill we’re dealing with.
These ponds can be built up using a dam that matches the height of one of the ridges, as long as you build out enough soil and rock material not only to contain the water’s weight, but also with plants on the dam to help solidify the dam with their roots. Often times, an overflow pipe will exist to allow for more weight on the dam while also allowing drainage that can be run into another water system.
With 40 feet of height, gravity irrigation from a dam can have as much pressure as a spray irrigation system and can be used as such.2 This would give you the benefits of spray irrigation for your annual crops if you wished while letting gravity pick up any energy costs. While my interest, at least right now, isn’t on talking about how to incorporate something like this, I do want it to be something in the back of your mind if you’re thinking about something like this over the long-term. The cost of building any dam comes down to a ratio of earth moved to water stored. When determining the ideal minimum shape of a dam, the length of the wall across a valley should be less than or equal to the distance water will back-flood.
So, for example, if your new pond, from the keypoint to the dam is 30 feet, your new dam should not be longer than 30 feet. The ideal depth is between 3 and 20 feet, depending on project size. This depth should include 3 feet of soil above the emergency runoff pipe we had mentioned before, the height between the full water line and the top of the wall, above the spillway level. This compensation will allow for3 feet of free-board during rain events where 3 feet depth of water evacuates the dam via the spillway. This extra safety precaution is to compensate for large, 50 or 100 year, floods. If we recall from the swale episode, calculating runoff can give you a good sense of how many cubic feet of water you’ll collect from rain can give you a good guidance of how much extra space you’ll actually want.
Now I mentioned putting in spillways. Spillways control the overflow of water through a wide level gap in the wall, which can be made out of concrete or it can be a pipe. The water flows evenly and slowly over the spillway and onto land outside of the wall that is also graded nearly flat. We can also use some of the tools we discussed in the swales episode to reduce runoff issues from this overflow. From here the water will be treated as rain that falls outside of the dam and its watershed. In a large rain event lock-pipes can be opened as extra insurance against an overflowing dam, but this should only be necessary in extraordinary rains.
Keylines in Context
Now that we understand how this works from a very local point of view, I want to pull this back out into the context of the other areas we had talked about, particularly in forest succession. One of the key focuses of that episode surrounded how the topography impacted which species did best where, and in a system that highly segregates this topography, it inevitably will also exacerbate those extremes. For folks looking to make microclimates or trying to keep a site as warm as possible, which I think is an interest for most people, keyline patterns create lanes on each topographical contour, which creates lanes that can direct cold air towards the middles of the ridges as it funnels through the valleys. If your goal is to, say, plant trees along your keyline, leaving gaps in the planting pattern or access tracks placed on ridge centers can help the draining of cold air. While we all want to create the densest, most efficient site possible, it’s important for us to be pragmatic about what our needs are in terms of accessibility, and the functionality of the site is just as, if not more important than its productivity.
Now I want to take a hard turn into the side of keyline design that has been getting a lot of press lately, and that’s keyline subsoiling. We touched on it a bit earlier when describing Yeoman’s interests in building better soil, but without building the contour keyline systems, subsoiling had little value. While subsoiling isn’t inherently a new idea, applying it in this system allows us to maximize its benefit. While traditional plowing pulls up the topsoil to accelerate the biology within the soil over the short-term, keyline ploughs work to create access points for biology to work deeper into the subsoil and to ultimately build topsoil downwards, in contrast with our common understanding of building new topsoil over the old.
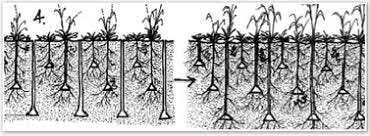
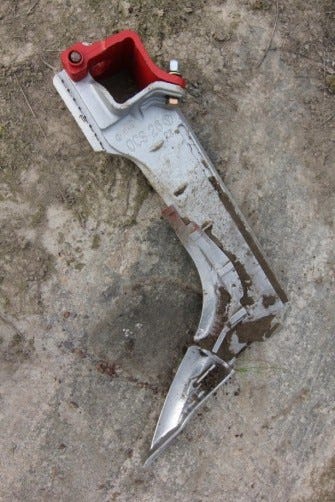
The most common example for this plow is the narrow shank profile, which is only an inch or so thick, cutting into the soil up to a few feet deep. The soil is cut open and looks as though someone rolled a massive pizza cutter across your property. This allows oxygen and biology to penetrate into those deeper regions in the soil, helping it aerate and ultimately allowing roots to penetrate deeper, accessing vital nutrients and minerals, while also minimizing surface damage.
I don’t want to get in too deep on this, but simply to get you exposed to what this process is. We generally want to subsoil when the soil is neither saturated or excessively dry, and often is a repeated process. Considering nearly 80% of all land in the United States was once farmland, chances are there is a plow pan somewhere in your subsoil. If you don’t recall plow pans from our soil episode, it’s from when plows were run through the fields and aerated the soil above the plow, but compacted the soil below it. These are generally about 10 or so inches down, and the first time you subsoil you’ll likely be focused on breaking through this. Some folks will continuously subsoil, sometimes in excess of 2 feet, while others will subsoil a couple times for the first few years and be satisfied with the current state of their soil. Not only does subsoiling help build your soil and improve the life of your plants, it also allows for massive carbon sequestration.3 Additionally, if we also recall from the soil episode, biology in the soil allows for more water absorption, and in creating more soil, not just dirt, we are exponentially increasing the water absorption of our site, significantly reducing the risks of flooding, runoff, and the need to water, even during the driest spells.
After implementation, the keyline system offers up a number of benefits. Some of these benefits are seen immediately, such as the stopping of erosion, while others take longer to show and are not as overt, such as restoring subsurface hydrological flows.
This process of slowing and directing water can also restore aquifers and ancient subsurface flows. These aquifers and subsurface flows act as a battery. Once recharged the surrounding landscape will come alive as springs begin to dot a once dry landscape. Further this battery of water will regulate the flow of rivers, preventing large floods by slowing the water and compensating for the flow lessening ill effects of drought, while also reducing nutrient runoff because of that slowing water.
Compared to swales, keyline systems are vastly more intimating for a number of reasons— because it’s usually a larger scale, it requires outside equipment, the involvement of geography and math can make it feel impenetrable. I get it. The first step is to take a look at your local GIS map— just about every state as far as I’m aware offers this online if you google it, and most countries do as well.
With a level and some graph paper, however, you can start to put some of the pieces together. You can pick up a laser level, the best option for this job, for as cheap as $60 at Harbor Freight. Using bulk sticks and string, you can start to mark out your site, and for a couple hundred bucks, you can rent a bobcat if you need to in order to remove obstacles like boulders or tree stumps.
If you really don’t have any equipment, but you’ve got land, you can rent a tractor for a day for $300 in most parts of the country, and if they don’t have a sub-soiler to rent, you can pick one up for $70 on Amazon, but I’m sure it probably won’t work more than a few times. But, if it’s a small property, that might be all you need. So, my point is that for probably less than $1000 and a weeks worth of work., you can do this. It’s intimidating, and everyone might think you’re nuts, especially if they’re your neighbors in suburbia, but you can do it.
Now, there’s a few practical questions, and again, the goal of this podcast, at least at this point, is to provide a broad overview of these areas so you can pick and choose the areas you have an interest and dig in deeper. For a lot of people, those topographic changes may only be a few inches, and that’s okay. The idea isn’t to create tiny walls 6 inches up, we can allow the slope to continue to exist in the ground, but our goal is to keep that keyline shape continuous across the property— keeping consistency across the property is imperative. Further, when we are cutting with our keyline plows to break up the subsoil, we want our cuts to be at most 30 inches apart, and if your goal is for annual crops, eventually you’ll want to make them closer to 15 inches apart. Like I said earlier, this is usually a multi-year process, although it doesn’t have to be, but this will allow for more long-term productivity, but even one run through your site is going to increase your water management and your production significantly.
You might be reading this and thinking, well, this doesn’t sound like we are following the rules of nature, which has been a big guiding point up until now, and in a sense, you’d be correct. One of the challenges we face today is that there are almost zero places left on earth that are inhabited by humans that hasn’t been degraded— not because humans are naturally destroying the planet, but because our understanding of how to live with nature and has caused nearly irreversible damage. But, we do have a scientific understanding of how things are done naturally on earth, and we are capable of taking processes like the wearing of the lands by time to create decentralized water systems that flow water water efficiency that take millions of years and recreate them in a day. In the same way we can use our incredible ability to breed species to be more resilient to the challenges of climate change, we can accelerate the landscape’s ability to also be resilient, and while we have been agents of negative change for the recent past, we can be just as effective agents of positive change.
The complexity of keyline is in my opinion, a large reason why swales are so much more popular— you’re no longer working physically with the landscape in a topical sense but tackling the bigger picture of why water management is a problem on a site. That said, it is in understanding these more complex ideas that we can build better, more resilient systems that reduce the need of inputs and increase sustainability exponentially.
Yeomans’ book, “Water for Every Farm” is an absolute good first place to look for information on this system— it’s practically the bible of keylines. However, it is a bit dry of a text, and if you don’t have a basic understanding of how these systems work before, you’ll end up reading it like 4 times before it makes any sense. Mark Shepard’s “Restoration Agriculture” and Richard Perkins’ “Making Small Farms Work” are more accessible texts that cover a comprehensive list of various subjects in regenerative agriculture but also have small sections on keylines, although they can be expensive books, so I wouldn’t recommend them as purchases if your sole interest is getting a better understanding of keyline systems. There are some good videos on keylines on youtube, many of which are done by Mark Shepard, and that’s a good place to start as well.
If you’ve enjoyed this piece, which is equal to a 24 page chapter, of (so far) a 310 page book with 114 sources, you can support our work a number of ways. The first is by sharing this article with folks you think would find it interesting. The second is by listening and sharing the audio version of this content (Episode 16), the Poor Proles Almanac podcast, available wherever you get your podcasts. If you’d like to financially support the project, and get exclusive access to our limited paywalled content, you can subscribe on Substack or Patreon, which will both give you access to the paywalled content, and in the case of Patreon, early access to the audio episodes as well.
Yeomans, P. A., & Yeomans, K. B. (1993). Water for every farm. Keyline Designs.
https://calculator.academy/gravity-fed-water-pressure-calculator/
https://www.sciencedirect.com/science/article/pii/S1462901118310177







Great article! Ive heard you mention/write about this before and looked into the book itself but it was a bit outside my usual price range.